

Frequently asked questions about - shipping, packing, movers.
If you have any questions, please feel free to ask us via email and we will get back to you asap on enquiries@uvp.co.za.
CORONA treatment is a well-proven and simple way to achieve good adhesion of inks, additives and lacquers on a variety of substrates. But while most converters know of its importance, many see it only as an auxiliary product – a box mounted near the unwinder on the press – and fail to appreciate what it can do to improve productivity.
Learning to understand how it works and, more importantly, how to get it to perform to optimum effect, has a major impact on the quality of the final printed product.
The key factor is achieving the correct level of treatment. Often, when encountering an adhesion problem, the typical reaction from an operator is to turn up the power on the corona treater – but this is not always the right thing to do. In fact, some materials are sensitive and can become over-treated or damaged with too much power. To get the right level of treatment, converters need to consider the substrate and the dyne level required for the ink, glue, lacquer or coating being used.
So how does a converter know what dyne level is required? Once again, this varies depending on application, but reputable ink and adhesive suppliers will be able to recommend correct levels for their products.
The corona effect also varies according to the type of substrate. Some materials are very receptive whereas others, such as PP, BOPP and OPP, are more difficult to treat.
Additives also change the effectiveness. Additives migrating to the surface require an increased watt density. In simple terms, the higher the slip additives, the higher the power the material will require.
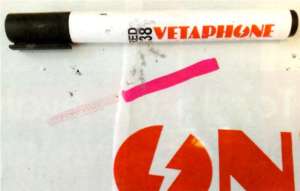
Taking all these points into consideration, Vetaphone recommends converters check the surface energy of each substrate before processing. This is done using a dyne pen after the material has been treated.
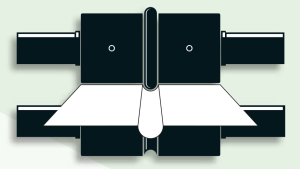
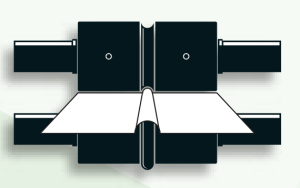
 Torn paper, wrinkles, uneven edges and fold lines or even cracks in the coating – a great deal can go wrong when folding. In most cases, this is caused by inadequate or incorrect fold preparation when perforating or scoring.
PERFORATION
This process reduces the material tension within the sheet and makes it easier to achieve a clean fold. Wrinkles are prevented, as the air trapped in the sheet during folding can escape. The best solution for perforation is to use the upstream slitter shaft at the first folding station. This reduces the distance the sheet has to travel and ensures it is positioned cleanly – for smooth perforation edges and a precise perforation line, even at high speeds.
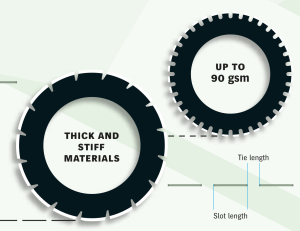
SLOT AND TIE LENGTH
The thicker or stiffer the product, the longer the slits and the shorter the ties. As a guideline, select a blade with short slots for up to 90 gsm paper, one with larger slots for art paper and large slots or a punching knife for thick, stiff materials. Following perforation, the tie must be sufficiently stable not to tear during subsequent processing (e.g. saddlestitching or adhesive binding).
SLOT OR PUNCH PERFORATION?
Slot perforation is suitable for signatures with less than 30 pages that undergo further processing after folding to create products such as brochures with saddle stitching or adhesive binding. Punch perforation is good for cross-folds with signatures of 32 pages or more and/or high grammages. Punching out tiny pieces of paper around 0.43 inches long and up to 0.047 inches wide (11 mm long and up to 1.2 mm wide) makes it easier for the air to escape than with slot perforation. Signatures prepared in this way hold together well at the sheet edges. The end product also lasts longer, for example book blocks with adhesive binding.

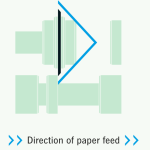
DIAMETER OF PERFORATING BLADE
The blade should extend at least 0.039 inches (1 mm) but no more than 0.078 inches (2 mm) into the counter blade. This enables it to cut through all layers of the fold without going too deep or tearing the paper on its way out. The undercut can be set precisely using the (upstream) movable upper slitter shaft.
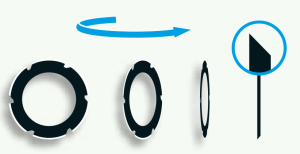
FITTING THE PERFORATING BLADE
The ground, inclined side should form an imaginary arrow pointing forward, e.g. toward the next folding station. This means the ties run backward when the sheet is inserted into the buckle plate. If the blade is fitted the other way around, the resultant forward projections can get caught when the sheet enters the buckle plate, which prevents a clean fold.
SCORING
This process is suitable for products with surfaces that cannot be cut open such as brochures, maps and thread-stitched or thread-sealed signatures. Compressing and displacing the material at the fold line prevents it from cracking or splitting open when folding the material or opening the end product.

DIAMETER OF THE SCORING BLADE
A scoring depth of 0.078 inches (2 mm) is sufficient in most cases. If the blade diameter is too large, it cuts into the sheet at the start and end and the sheet can tear at the front and rear edges. If the scores are too narrow, though, this may cause cracks in the fold or wrinkles at the scoring ridge.
NEGATIVE SCORING
This method is ideal for thick grammages of 170 gsm or more. Fitting the scoring blade underneath rather than on top as is normally the case improves paper displacement during folding to create an inward-pointing scoring ridge. This prevents the paper’s fibers and coating from cracking. It also creates clean fold edges. Alternatively, the Tri-Creaser Fast Fit can be used for grammages of up to 350 gsm. This tool has a rubber ring instead of a scoring blade. The ring runs against a steel female die (scoring groove) with recesses. The different groove widths and corresponding rubber rings are marked red, blue and yellow according to the thickness of the grammage to be processed.
DIGITALLY PRINTED PAPER
This cracks more easily than offset sheets because the toner lies on the paper. To prevent this from happening, it is advisable to use the Tri-Creaser Fast Fit for scoring. The trick with this tool is not to select the same colored groove width for the rubber ring, but the next one up – the blue ring with the yellow groove, for example.
If you’re planning on moving overseas in the future, you probably already realise that you’re undergoing a great process which will require both patience and understanding. Here’s a list of packing symbols to review when overseas shipping. You may see these as cartons arrive in your new home or as you travel. You may also purchase your own labels to keep yourself and others protected throughout your move. Either way, becoming familiar with these images and their meanings will keep people and contents safe.
Top 14 International Packing Symbols You Should Know
1. Wine Glass

This cracked wine glass label lets you know the item(s) inside is “fragile.” You’ll notice this symbol on cartons containing items such as china and glassware.
2. Hands with Box

When you see two hands cupping a cube, you know that you should “handle with care.” Contents are more than likely fragile, made up of intricate parts or otherwise easily damaged.
3. Flames

If you see the picture of fire, you must know the material inside is “flammable.” Keep the shipment away from open flame, sparks, smoking and hot surfaces.
4. Upward Arrows

The image of two upward arrows above a box indicates, “This way up.” For the duration of shipping/delivery, the carton should face upright.
5. X Over Hook

A symbol depicting a hook marked over with an X says, “Use no hooks.” Absolutely no hand hooks should be attached to pull the parcel.
6. Multiple Boxes in Prohibition Sign

If you see the universal no-sign covering a tower of boxes, then “do not stack.” The image might even display a couple of boxes toppling to the floor, showcasing the outcome if you pile cartons.
7. Person Lifting in Prohibition Sign
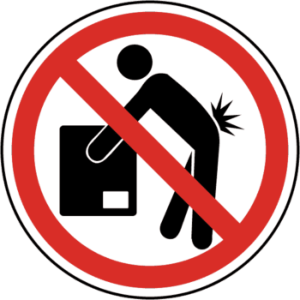
When you’re moving boxes with this label, note that they’re “heavy,” so “do not lift.” You’ll need a trolley.
8. Stacked Boxes
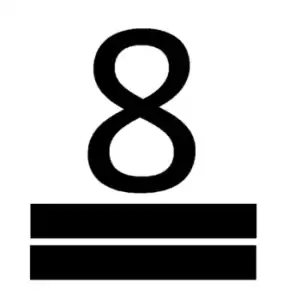
Pay attention to numbers on the stacked boxes icon. If you see “3”, the “stack limitation” is 3 units. Some stacks will have top boxes marked with an 8 and X, for example. You then know the “max carton” stack is 7.
9. Box Beneath Sunshine

When you encounter the box under a sun and roof, this means “protect from heat.” It’s similar to the next symbol but less specific.
10. Thermometer
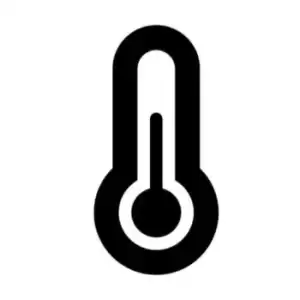
The thermometer image is more particular, in that it will provide “temperature limitations.” It’s important to store containers between the noted degree range.
11. Umbrella and Rain

The umbrella reminds you to “keep dry.” The package should never get wet or be stored in damp areas.
12. Scope
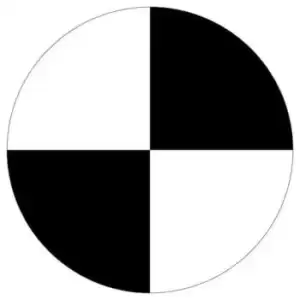
This iconic scope image represents the “centre of gravity.” The label instructs handlers with regard to the weight distribution of parcels.
13. Two People Lifting Box
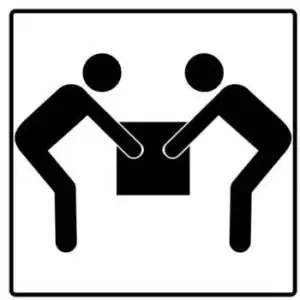
This one seems obvious, but be sure to watch for warnings about a “two-person lift.” Sometimes, you don’t need a trolley; you simply need another able body.
14. Boxes on Trolley

Don’t ignore this symbol. “Only use trolley” when you see it. Some items require not only major support but a smooth transition.